SLIDER

Wedding Dress Fashion Illustration | Laura

Many people don't know that I do custom illustrations of wedding dresses!  It's true. 

You can find the listing HERE on my Etsy shop!

(I'm going to let you, my readers, in on a little secret.  I'm raising the price of these beauties on February 9, 2015; So if you've been on the fence about getting one, now would be a good time while the price is still low!)

Here is my latest one!

Have a great weekend!

i love you a bushel and a peck | basic calligraphy demo

I really like Valentine's Day.  I like pink and red and white and gold all together.  I love having a day where I have an excuse to be completely mushy to my husband (other than his Birthday or our Anniversary).  He even sent me flowers last year, which, if you know my husband,  is a really really big deal.  Anyway.  I love this little phrase, "I love you a bushel and a peck".  I made a little calligraphy demo of me writing out the phrase.  You can check that out HERE.  :)
Have a lovely day!

easy DIY watercolor valentines

 
I am so excited to share these super easy watercolor valentines with you! 
 
Supplies Needed:
Watercolor Paint.  (I used these Artist's Loft paints, but really any watercolors you have will do.)
2 paintbrushes.  (One smaller one for the masking fluid, and one larger one for the watercolor washes)
Watercolor Paper cut into 3x4 inch pieces
 
 
Start by painting your designs with the masking fluid onto the white watercolor paper.  The watercolor paper has to be dry for this to work.  Try things like hearts, x's and o's, and other short Valentines phrases.
 
 
Note:  As soon as you're finished painting with the masking fluid, wash out your paintbrush with some soap and cold water. 
 
(Don't use hot water, because it will melt the glue holding the bristles in place. :)  We don't want your paintbrush bristles to fall out!)

 
After the masking fluid is completely dry, paint some watercolor washes over the top.  The more water you use in your paint the better.  I love to let my paints bleed into each other. 
 
Next let your paint dry completely.


Once your paint is completely dry, grab an eraser and erase right over the top of the masking fluid. 
It should easily come right off! 

 
Voila! You're left with your designs in white with the watercolor washes over the top.  I love this look!
 
Enjoy your super cute handmade Valentines!

 
Let me know how your Valentines turn out!  I would love to see them.  Tag me on Instagram @erin_nielson and use the hashtag #erinArtLessons to see what other people have created! :)


My Favorite Drawing Supplies

Hello there!  Today I'm sharing my favorite drawing and sketching supplies. 


1.  Mechanical Pencils.  I am picky about how a writing utensil feels in my hand and I'm also particular about how good the eraser is.  With that said, I prefer the BIC #2 mechanical pencil with 0.7mm lead.  I love that they're easy to carry around in my purse because the lead can be pushed back into the pencil and doesn't leave pencil marks in my bag! 

2.  Eraser.  I love this Staedtler eraser.  When you're looking for erasers, make sure you feel them to see if they're soft.  If they feel a little bit hard or very smooth when you run your thumb across the top, they will most likely leave marks when you try to erase something.  We don't want that!  I like to stick to soft, white erasers.  They're usually a good bet!

3.  Paper.  I have so many different sketchbooks and papers it's not even funny.  I'm a sucker for blank paper.  My favorite sketchbooks are anything from Canson.  I love the quality of paper.  Here is my favorite spiral bound sketchbook.

4.  Pens.  I usually do pens for outlining, and I often use a pen if a pencil isn't available.  I love the fine tips on these Micron pens.

5.  Markers & Colored Pens.  These Staedtler colored pens are so much fun.  I love all the different colors they come in.  These are my favorite when I'm just doodling.  For more finished sketches I like to use my Prismacolor markers.  These are pricey, so make sure when you buy a set at Hobby Lobby or Michaels to use a coupon!  You can also buy them individually which would be great for a basic starter kit.  I also just buy the markers individually when one of my colors has run out and I need a replacement.

6.  Colored Pencils.  Prismacolor is my go-to for colored pencils.  They are amazing for blending and come in all sorts of good colors! (Can you tell I have a thing for color?)


Okay, I've shared my favorites.  What are your favorite basic drawing tools?

so you want to be a florist?

I took this post from my Floral Design by Erin website.  I have slowed down quite a bit on the floral end of things, but I still get asked about floral and how to become a florist, so I thought this was worth revisiting!  Hope this helps.  As always, feel free to email me with your questions!


***


So you want to be a florist?  Obviously you have a little bit of knowledge about how to care for flowers and arrange them.  (or maybe you don't quite yet?)  Either way, here are 3 skills that are absolutely essential if you want to pursue a career in floristry that maybe you hadn't thought of! 


photo by Evelyn Eslava

1.  You have to have vision.
When you're meeting with clients about their floral, you aren't just taking into account the colors of their wedding and the season of the particular event.  While those things are important, there's much more to it than that.  
You're also taking into consideration the personalities of the bride and groom, their story, their idea of how things should look at their event, and the overall feel.  You have to think of things that they hadn't thought of.  Your clients will ask you styling questions.  You have to be prepared to think outside the box and come up with personalized solutions.  Every person is unique, and thus every floral order I take on is catered to that particular person.  
You have to be able to see the big picture when doing floral.  When you're putting together the recipes for their floral you must also think about things like vessel choices, ribbons and trims, linens and other details that will relate to the flowers!
Along with having a vision for your clients, you must have vision for yourself and your business.  You will fail at times.  Does that mean it's the end of the world?  Not at all!  Failing means you are trying.  Learn from your mistakes and set higher goals for yourself the next time.  See the big picture!

2.  You have to have a business mindset.
This is huge.  You need to be professional; after all, this is a business you're running!  You need to think about marketing, social media, taxes, networking, business licenses, time management, and how/when/where to meet with clients.  You need to know how to set up invoices, how to price, and how to write emails to clients.  You need to have organizational skills!  Oh, do you need to have organizational skills!  You meet with so many people that everything can blur together really quickly.  There is just so much that goes into the business side of a floral business that I won't get into here.  They need their own posts which are in the works!  

3.  You have to be a people person.
You have got to feel comfortable talking with strangers.  You have to be really good at reading people.  You have such a short amount of time to meet with clients and get a feel for their personality and individual style.  You need to make that client feel like they are the only client in the world!  It is absolutely essential you don't mess up in this area.  If something goes wrong (heaven forbid!), make it right!  While we are talking about the subject of making something right, there is also a fine line between making things right and being walked on.  You must stand up for yourself always.  Never ever compromise your standards for a client (or for anyone for that matter).  Make sure they know where you stand, and make sure you know what their expectations are.  If someone isn't a good fit for you, you will not be a good fit for them! (more on this later, too!)
The other part to being a people person is networking.  Networking is huge, especially in the wedding industry.  There are so many brides and vendors who will refer their friends and clients to you if you are talented, but especially if you're kind.  I believe in treating others how you would like to be treated.  I try to treat everyone I meet with kindness and courtesy.  Unfortunately, not everyone you meet will reciprocate.  Even though it may really stink to resist the temptation to be rude to those people, others will remember that you are nice and it will pay off.  I promise!

 
If you are just starting out, let me know!  I love to answer questions, because I love when people answer my questions.  (I think it's silly when people keep things so secretive about their business, so I promise to be open with you!  We're all in this together!)  If you have any immediate questions you want me to address, feel free to comment below or email me at floraldesignbyerin@gmail.com!


***


watercolor supplies

I get asked about what supplies I use ALL the time.  Today I'm sharing my favorite watercolor supplies. 
You'll notice the watercolors I use are in pan sets.  Someone asked me why I don't use tubed watercolors. 
2 reasons. 
I am a poor college student, and I like that all the paints come in a case and are ready to go any second.  I like to take my paints with me on vacations, so it makes taking them with me easy. 

For Beginners:

1.  Artist's Loft Fundamentals Watercolor Pan Set - These are great for beginners or if you're not quite ready to invest in watercolors.  You get what you pay for; these dry with kind of a chalky look, but I love this set because of all the colors that come in it.  I bought mine in early 2014 and already need to replace them.
2.  Artist's Loft Necessities Natural Hair Brushes - There are a ton of sets you can buy at any craft store.  Just make sure you read the label and get watercolor brushes!  This is an inexpensive way to get a variety of sizes and shapes, too!

Intermediate/Advanced:

3.  Winsor & Newton® Cotman® Watercolor Compact Set - I love this set.  It's compact and can fit in my purse.  The quality is awesome, but it doesn't have as many colors so you have to get good at mixing ;)  I bought this set 5 or so years ago and it's still going strong.  Definitely worth the investment.
4.  Yarka Professional 24 Color Set - I just recently bought these for myself and LOVE them so far.  The colors are rich and the paints are very creamy for being a pan set!  I read lots of reviews before I purchased these and everyone loved how long they last.  Someone had purchased these in the 90's and said she was still using the same set!  Sweet!!
5.  Winsor & Newton® Cotman® Round Brushes - My favorite brushes of all time are the Winsor & Newton Round Brushes in a 4 and 6.  I rarely use anything else.  I love how versatile the shape is, and the size is perfect for me.


 Paper:

For Beginners:
 Artist's Loft Fundamentals Watercolor Pad

Intermediate/Advanced:
Canson Watercolor Pad
Arches Cold Pressed Watercolor Block

I hope this helped!  Let me know if you have any other questions as I just covered the very basics!  Happy painting! xo

Watercolor Bouquet Portrait

I saw this bouquet by Soil and Stem on Heather Nan's Instagram account and instantly fell in love.  I am obsessed with that bouquet!  It's so beautiful in every way.  I was so inspired by it that I asked their permission to paint it for a bouquet study.  They were so kind to say that I could!  Here is the finished product. 
First, I started by sketching it out.  Next I made a color study.
  

Next, I created the finished piece.  I'm in love with how it turned out, I may have to do more of these bouquet portraits!  I'll be on the lookout for bouquets that inspire me.  Email me if you'd like me to try yours next.  I need more practice!  (I'm not making any promises, but if I see one that makes my heart happy I may decide to paint it!)


***

Wedding Invitations | Laura & Justin

I don't get to do wedding invitations very often because they are so time consuming, but then seeing the finished product makes me wonder why I don't do more of these.  Laura's wedding planner, Emmily Jones of Charming Details, contacted me about doing these wintery invitations.  
I did the design and then Rowley Press printed them for me.  Rowley Press is amazing.  I love working with them!
The rsvp cards were my favorite of the suite. 
I hand lettered the whole suite and did the watercolor greenery as well. 
I really like how they turned out!

3 beginner watercolor techniques to try

You do not have to be an expert painter in order to create beautiful artwork.  Here are my favorite beginner techniques to try!
1.  Wet on Wet
 Get the area you want to paint nice and wet using a clean brush and clean water
 Next, add watered down pigment (paint) allowing it to bleed into the water that's already on your paper.
While the paint and paper are still wet, add a second color and let the two colors blend together.
2.  Glazing
Glazing is layering with very watered down pigment creating a glaze to get that see-through look. 
 I painted three colors and let them dry completely.  (Allowing the paint to dry completely before glazing is KEY!)
 Next, I added my second color over the top of the first.

If you don't wait long enough for your first layer dry, it will bleed into the color you're trying to put over the top.  You can see on my example the red hue started to bleed because I didn't wait quite long enough.
3.  Gradient Wash
 Wet your paper just like in the first technique.  Add watered down paint to one side letting it blend into the water.
While the paint and paper are still wet, add a slightly darker paint and let it bleed into the first color you added.
 This technique is really great for creating an ombre look in your art!
As always, let me know if you have any questions!  If you post any pictures using this technique please tag me!  @erin_nielson and use the hashtag #ErinArtLessons to see what others have posted.  Happy painting!

basic calligraphy supplies

If you haven't jumped on the calligraphy train yet, I suggest you do so!  Pronto!  It's so fun, easy, and very relaxing! ..At least I think so....  ;)
Initially I got started at a calligraphy workshop with Melissa Esplin (link below), but then I've been watching videos on YouTube, reading the Modern Calligraphy book (link below), and I've just played around with different holders, nibs, inks, and paper.  Really, it's just trial and error until you find something you love.  The nibs and holders that I love may not be your favorite.  So get a bunch and just play!  It's so fun! (I can't say that enough!)

Here is a little infographic to show you what the very basic supplies are.  I've included links below!  Let me know if you have any questions!  I will continue to blog about this fun hobby, so stay tuned!


You can find calligraphy supplies at pretty much any craft or art supply store, I've included some links below so you know what you're looking for :)

My go-to places for calligraphy supplies are Michael's,  Provo Art & Frame and Paper & Ink Arts.


Ink:
(look for acrylic-based or calligraphy inks. 
If your ink is too watery it will bleed!)
I love Windsor & Newton Ink the best so far.


Nib Holders:


Nibs:
Some of my favorites for beginners are:


Classes/Reference


Hopefully this helps!  Have fun!

happy January!

I'm not sure how happy January is... it's a little bit too cold for me.  I'm so ready for Spring! 
 
Either way, I made this little video of me writing out "happy January" if you're interested! 
You can watch the video HERE
 
Now I'm going to go make me some hot chocolate and snuggle up watching Friends on Netflix! ;)
 
What do you like to do when it's too cold to go out and play?

storage & organization ideas for creatives


(This is my desk.  It is never this clean.  I made sure to make it look kind of decent for photo purposes.)

I am a little bit OCD when it comes to how I store my art supplies.  I need to know where they are and have them within arm's reach on my desk.  I like to see everything I'm working with.  So, I'm going to share a few my favorite organizing products with you!

1.  Clear Acrylic Drawers
I am a little bit obsessed with the acrylic drawers from The Container Store.  The ones I have on my desk are the Half Tall Luxe Acrylic Modular Drawer Clear.  I actually bought them to hold my makeup, but when I saw how nicely they would hold all of my calligraphy inks in plain sight I was sold!  (Side note, have you ever been to The Container Store?  It is heaven for anyone who loves to organize like I do! Find your nearest store and go.  Seriously.  It's amazing.)

2.  Jars
Jars, really?  YES!  I love to be able to have my pens, pencils and watercolor brushes on hand.  I picked up the polka dot bucket in the dollar section of Target and the jar is from Michael's.  Honestly any mug, cup or jar will do the trick.

3.  Plastic Organizer
I keep all of my calligraphy pen holders and nibs together in a plastic organizer (similar HERE).  I love that it's small and I can take it with me anywhere.

Do you have any favorite storage or organizing products that I need to know about?  Please tell me about them!

on goals and dreams

Let me tell you something.
My dreams and goals are constantly changing. 
And you know what?  That's totally okay.  There are no rules. 
You can do anything and be anything you want to be. 
You're never too old to set another goal or to dream a new dream!

Part of why I chose the word Glow for 2015 is that when a new fire starts to burn, it doesn't burn bright right at first; it glows.  Another reason is when you are so happy people often will tell you you're glowing! :)

***
I absolutely love this quote and thought I would make this Free printable for you! Yay!
Download the printable HERE! :) Happy Thursday! xo

the basic color wheel

I don't know about you, but I get a little bit giddy when I see any type of color wheel.  Seeing the colors together in order just makes me happy. 
***
 Complementary colors are straight across from each other on the color wheel.  Here I've shown you Red and Green, but this could also be Orange and Blue, Yellow and Violet, or Blue-Green and Red-Orange.  (You get the idea.)  It's important to note that when you create a complementary color scheme, one color should be vibrant and the other should be more muted so your eyes don't hurt when you look at it!
 Double Complementary just means 2 pairs of complementary color combos put together.  I've shown you Orange & Blue paired with Yellow & Violet.
 Monochromatic color schemes use only one color.  You can use many shades and tones as long as they are in the same color family! 
 Split-Complementary means that you start with the complementary, in this case I chose Orange & Blue, and then instead of Blue, the color scheme splits and goes to the colors directly next to that color.  We ended up with Orange, Blue-Violet & Blue-Green.  It could also be Red-Violet paired with Green and Yellow.  It's fun to play around to see what combos you can come up with!
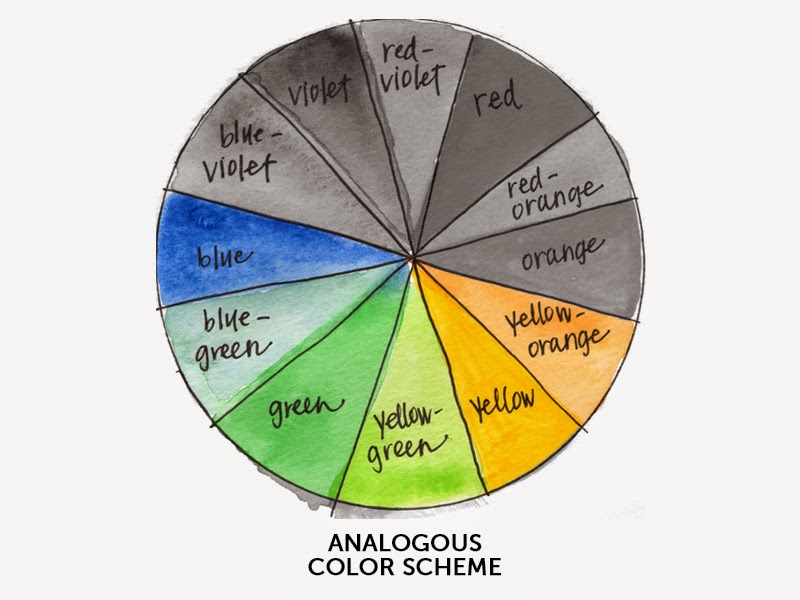
Analogous color schemes are at least 3 colors directly next to each other are paired together.
Triad color schemes are equally spaced apart on the color wheel.  This could also be the primary colors, (Red, Yellow & Blue) or Secondary Colors (Orange, Green & Violet) put together.
I hope this little post helps you when you're stuck about what colors to use on your next creative project!  It's fun to play around with different combinations to see what you come up with!  Comment below and tell me what your favorite color schemes are!

glimmer, glimmer

January always brings reflection of the last year and optimism and goals for the year ahead.  This year I haven't felt like setting goals was appropriate.  Not that I don't have them, because I do.  I have lots of goals.  But 2014 taught me that nothing ever goes according to plan.  I didn't want to have a to do list of things to get done and lose focus on what matters most. 

So, this year I wanted to try something new.  I had heard of Ali Edwards' One Little Word before, and the more I thought about it, the more fitting it was for me for 2015.  I love the idea of having an underlying theme to my year... Something simple to focus on and to get back on track really quickly if I lose sight of where I want to be by the end of the year. 

Lots of words sounded good and meant a lot, but the one that kept coming back was glow. 
For me, the word glow encompasses everything I want to focus on this year personally, professionally, emotionally and spiritually. 
Here is what I found on dictionary.com on the word glow:
noun
1. a light emitted by or as if by a substance heated to luminosity; incandescence.
2. brightness of color.
3. a sensation or state of bodily heat.
4. a warm, ruddy color of the cheeks.
5. warmth of emotion or passion; ardor.


verb (used without object)
6. to emit bright light and heat without flame; become incandescent.
7. to shine like something intensely heated.
8. to exhibit a strong, bright color; be lustrously red or brilliant.
9. (of the cheeks) to exhibit a healthy, warm, ruddy color.
10. to become or feel very warm or hot.
11. to show emotion or elation: to glow with pride.


I'm excited to try the #OLW thing.  Perhaps I'll do this every year!  If you're doing One Little Word this year, what is the word you chose?

the letter A

Was your New Year's Resolution to learn calligraphy or watercolor painting? 
 
Okay, maybe it wasn't, but either way I have great news! 
 
I have started a YouTube channel where I will release little tutorials on mostly calligraphy, but also watercolor painting and other things people have been asking me to teach them how to do!  I'm really excited. 
 
 
You can watch my first video on different ways to write the letter A HERE
 
Note:  I am not a professional videographer or photographer.  (I have no clue what I'm doing!)  So, watch the video knowing that I am a beginner!  Hopefully the videos will get better as I learn more.  :)
 
© ERIN NIELSON • Theme by Maira G.